My blog about my wargaming activities. I collect a lot of 15mm miniatures for the American War of Independence and so collect a lot of rules for this period. I started miniatures with Napoleonics, so I have a number of armies in 6mm and 15mm figures for skirmishing. I have15mm WW II figures that I use for Flames of War, Memoir '44, and someday, Poor Bloody Infantry. Finally there is my on-again, off-again relationship with paper soldiers that I sometimes write about.

Monday, January 30, 2012

Drums and Shakos Large Battles Playtest

As always, let me start off by welcoming new reader TasminP. I hope you enjoy the read.

As I threatened in my blog entry about Drums and Shakos Large Battles (DSLB) being released, I am wary to completely grade a set of rules on just a reading; so many times I have found what looks good on paper does not always work on the tabletop. I have equally found that subtleties in a rule missed in reading suddenly dawn on you when you get whacked with their significance during a critical moment. I can start by saying that there were no negatives for me, but more than a few whacks on the fanny during the game.

The Scenario

I decided to play the Battle of Eckau (18 or 19 July, 1812 depending upon the source), which is about 6,500 men versus 5,500 men – just the right size to try out the rules. George Nafzinger has a write-up of the battle in his book Napoleon's Invasion of Russia and there is an excellent map on a Latvian re-enactment web site. I also used Digby Smith's The Greenhill Napoleonic Wars Data Book for the order of battle.

First off, this is an unusual Napoleonic scenario in that it is Prussians attacking the Russians in what is modern-day Latvia (southwest of Riga). The Prussians (and Austrians) were part of Napoleon's Grande Armee in 1812 and were on the northern attack route. What is interesting is that there were several engagements and they did inflict casualties on one another. So, why did I choose this? To be honest it was that my French are way too far from being re-based, but my Austrians, Russians, and Prussians were not, so I dug through Digby and up came a battle just the right size. Historically the Prussians won, but the number of casualties was roughly the same (depending on the source) and relatively low.

Let's start with the map (click to zoom). As you can see, the Prussians (in blue) are attacking from both the southwest and the northeast, with the Russians (in green) in the central position and eventually retreating northward. (By the way, if you want to look at this area in Google Earth – and see how little it has changed – search for Iecava, Latvia, which is its modern name.)

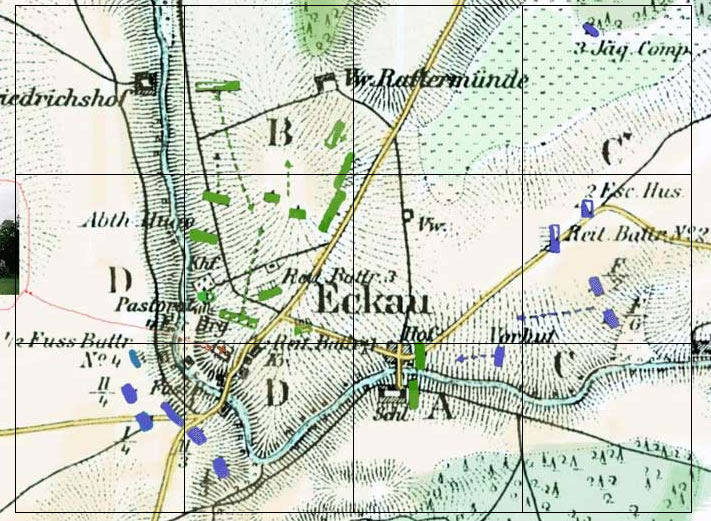
According to the map, the river (creek?) is sunken and the ground slopes upwards away from it.

In translating this map to the tabletop I counted the water as difficult to cross – Nafzinger's description does not mention any particular problems with the Prussians crossing nor with being forced to assault across the bridge. The "town" (built-up area in DSLB) is on the Russian's left flank and includes a prominently large building (a school, I believe). Other prominent features include a hill to the Russian rear and a small knoll by the bridge.

The Forces

Prussian

Unit
No.
Q
C
Sk
Special
Notes
Musketeers
4
4
4
2
Drilled
Jagers add 1 to Sk
Fusilier
2
4
4
2
Light
-
Jagers
1
-
-
-
-
Jagers added to Musketeers
Dragoons
2
3
4
-
-
-1 to C for small size
Hussars
2
4
3
-
Élan, Scout
-1 to C for small size
Horse Artillery
2
4
-
-
Light, Horse Artillery
-
Light Artillery
1
4
-
-
Light
-
Medium Artillery
1
4
-
-
Medium
-

The 1st Brigade was composed of the four Musketeer battalions and the Jagers (deployed as skirmishers). The Jager deployment was not historical – it was actually in the woods in the northeast corner – but the map shows a 1/2 Fusilier battalion that is not in Smith's OOB. That combined with the fact that I had not completed painting the Jagers convinced me to deploy them out!

The 2nd Brigade was composed of the two Fusilier battalions, the two Hussar regiments, and the two Horse Artillery batteries. Note that the Hussars are small regiments, two squadrons each, so they are penalized -1 C, as indicated in the rules (page 34).

The Reserve is composed of the two Dragoon regiments, the Light Foot Artillery, and the Medium Foot Artillery. As with the Hussars, the Dragoon regiments are penalized -1 C as they are two squadron regiments.

Given the size of the forces involved, the Prussian certainly seem to possess a lot of artillery, even if it is mostly light.

I intentionally chose to give the Prussians two small Dragoon and two small Hussar regiments, rather than combining both and making two standard sized regiments, as I wanted to see the effect of more but weaker units versus fewer but stronger ones.

Russian

Unit
No.
Q
C
Sk
Special
Notes
Musketeers
4
4
4
0
Drilled
-
Jagers
1
4
4
1
Light
-
Militia
3
5
3
0
Militia
-
Dragoons
1
3
5
-
-
-
Uhlans
1
4
4
-
Lance
-
Cossacks
1
?
5
-
Lance, Light, Opportunistic, Scout, Unpredictable, Wavering
+1 to C for large size
Heavy Artillery
2
4
-
-
Heavy
-

The Russian 1st Brigade consisted of one Heavy Artillery battery (on the knoll), three Militia battalions, and one Dragoon regiment. This mixture of militia infantry and cavalry is unusual and was only done because of the positions shown on the map. (I now realize that the unit positions may not reflect starting positions, but some unknown point within the battle, which may account for reserves being committed and Brigades intermingling.)

The Russian 2nd Brigade consisted of the Russian jager battalion and three Russian musketeer battalions. The Jagers and one Musketeer battalion are isolated from the rest of the Brigade as they are stationed in Eckau and the school.

The Reserve consisted of one Heavy Artillery battery, one musketeer battalion, the Uhlan regiment, and the Cossack pulk (regiment). Note that at 500 men, the Cossacks are a large unit, so they have an unusually high C. I made them Unpredictable, as the author suggests, rather than giving them a Q of 5. I added a few other special rules – Scout, Opportunistic, and Wavering – as I felt they fit. Opportunistic would offset a Q of 5, but seems deadly with Unpredictable, which I do not think fits. Wavering properly reflects their reluctance to Approach on the battlefield.

Deployment

Deployment was as indicated on the original map, save that the Prussian Jagers were dispersed amongst the Musketeer battalions, as previously noted, and the Prussian Reserve was allowed to choose whether to appear behind the 1st or 2nd Prussian Brigades. My opponent, Don, chose to put them behind the 1st Brigade, in the southwest corner of the board.

The Russian deployment is a bit muddled on the original map. The 1st Brigade was deployed forward and towards the southwest while the 2nd Brigade covered Eckau and the east. The Reserve was to the north and quite some way behind the lines.

Here is how the original map translated to the OOB I used from Smith.


The Battle

As the Prussians were the attackers historically, and they actually surprised the Russians to some extent,  so they moved first.

The Prussian Fusiliers attacked into the town of Eckau and drove out the Jagers from the first BUA sector with some hot die rolling (and a misinterpretation of the rules on my part). The horse artillery unlimbered are started bombarding Eckau from long range with little effect.
This was largely due to my having mis-/not completely read the rules on Built-Up Areas, so the Jagers yielded the town much too easily.
On the opposing flank the Prussian attack immediately stalled when the Russian heavy battery opened fire. One Prussian battalion took heavy fire as did the limbered reserve artillery behind it.
The Russians were able to bombard in reaction and then immediately reload and bombard in their turn. The dice for the Prussians did not help either. The battalion quickly accumulated DIS and with bounce-throughs and the retreating infantry, one battery to the rear accumulated DIS2.

The Russians, in turn, were able to move the Uhlans up from reserve while advancing their 2nd Brigade towards the bombarding horse artillery batteries.

One quickly finds out just how far cavalry can charge if the get a good roll. One Russian musketeer battalion had been sneaking up on a horse artillery battery (with a successful reaction roll) when the Prussian Hussars charged and rolled over the infantry, caught in attack column.
DSLB, like Command and Colors: Napoleonics, is pretty unforgiving of infantry caught in the open in line or column by cavalry. They stand a chance (less so in attack column), but the odds are against them, even if they have taken no DIS.
With a battalion of regulars quickly lost, the Russian left flank enters square in the face of two Hussar regiments. Unfortunately, this is also in the face of two horse artillery batteries (though at long range). In the 1st Brigade, the Dragoons move to try an flank the Fusiliers moving to secure Eckau, but it is too late, the Prussian Fusiliers chase down the Russian Jagers and drive them off at the point of a bayonet. The Jagers rout.


Suddenly, with a roar the Prussian infantry pushes up the hill and attacks the unloaded Russian battery on the knoll. With little effort they overrun the Russian position, ending up with their right flank behind the Russian Dragoon regiment. The Russians quickly react and turn their unit around, ready to charge the Prussians in the flank ... but somehow the Russians cannot muster the courage.
This is one of those "oh boy" moments when you have a great move and the dice just will not co-operate. The Dragoons, with a Quality of 3, and within Command Span of their Leader, need only a 2 or better to activate. I grab three dice and roll ... three 1's! The Dragoons and the whole Brigade stands frozen.
On the left flank the Russians realize that if they do not remove the cavalry threat their squares will get torn apart by the horse artillery. The Uhlans charge the first Hussar regiment and ride it down. In their breakthrough they charge the closest horse artillery battery, but are told off by canister.
Technically, a cavalry breakthrough puts the cavalry unit directly into Contact, bypassing the Approach, but my dice failed me and not my opponent's so it sounds better that I was told off by canister than to admit that my troopers were beaten by ramrod-wielding men!

As the Uhlans were recalled in great disorder, the Cossacks were finally committed to that flank in order to stop the remaining Hussar regiment from wreaking any havoc on the infantry. At this point the Russian 2nd Brigade is shaken. I only have a single heavy artillery battery in reserve now.

The Prussian advance at the bridge continues, with the Dragoons leading. The Russian Dragoons finally receive their orders and charge the still-exposed flank of the line infantry on the knoll, destroying them. The Russian Dragoons are then recalled to a position behind the knoll just as the Prussian artillery starts to site the position for fire.


The Prussian Dragoons stall at the river (they cannot use the bridge as they are deployed in line) while their artillery limber up and move towards the bridge. The Russians know that if the Prussians get past the bridge the position will be lost. The Brigadier orders the Russian Dragoons to charge, and save the command.

The combat between the Dragoon regiments is hardly a contest as the Russians have the upslope and the Prussians are caught in the water and a smaller regiment. The Russians cut through the Prussian Dragoons, routing them, then breakthrough into the limbered artillery on the road directly behind them, also destroying them. However, the Russians are recalled in great disorder, which confuses the Russian militia into thinking that the Dragoons are routing and a general panic ensues. The entire Russian line retreats, ending the battle.
Note that a recall cannot caused a rout, this is just literary license. What happened was that I had pushed the Dragoons into one combat too many and they were recalled with DIS3 on them, which tipped the Brigade over the edge and caused it to be Shaken, which tipped the Division over the edge and caused it to reach its Breakpoint. I lost because I won. How ironic!

Summary of the Game

I really enjoyed the game even though it felt a bit slow at first. I attribute that to our not being used to the rules, the unusual setup (surrounded on two sides, split commands versus interior lines, etc.), and to getting used to the Reaction rule.

Let's start with that rule. Essentially, in Ganesha Games designs the player gambles by deciding whether to use 1, 2, or 3 dice to activate, then rolling them against a target number to count successes and failures. In other designs, the number of failures is significant only if you roll two or more; in DSLB every failure is significant in that the opponent gets to roll a number of dice equal to the failures to see if he can activate to react to the opportunity of your failure. (Two or more failures also represents a turnover by that Brigade.)

This "reaction to the opportunity of your failure" is abstract, however. The unit testing to react does not have to have any relation to the unit failing. For example, it does not need to be the unit or Brigade acted against, within a certain of the failing unit, or even within line of sight. It is not even restricted to reacting to the unit that failed. Simply put, the acting player gambled and lost, and the reacting player can take some action in consequence. It is a simple extension of the risk versus reward decision that the player has to make every turn for every unit acting.

The reason this rule is significant is because it makes game play very fluid. Most activations, unless lucky or using few dice, fail at least once, giving your opponent something to do (if only to pick a unit and roll). This made it feel much less like an IGO-UGO game. As I stated in my initial rules review, a reaction die might allow a player to form a hasty square in the face of a cavalry charge or allow the defender to launch a counter-charge to block a charge against a particularly vulnerable unit. In short, it relieves the author from writing a score of special case rules (like forming emergency squares, counter-charging, closing fire on a charge, charge evasion, etc.) by providing one simple elegant solution.

All that said, my opponent definitely did not like the rule, at least not the aspect of the reaction could be taken by any unit anywhere. In correspondence with the author, he indicated that some of his "old school" gamers initially objected to the rule too, but eventually saw the utility of the rule and accepted it.

Final Analysis

Naturally, with any new rules you need to get used to them. The second game will generally always be better than the first as you will in all likelihood play the rules more consistently as you correct your mistakes. This was the Heads Up rating given in the initial review.

So, to review my review let's go down the points I raised and the final ratings.

I've discussed the reaction rules above and I think my initial assessment was correct in that this solves more problems than it creates. It saves the author from writing, and the player from remembering, a rash of special rules to deal with the problems of a traditional IGO-UGO turn sequence. The Lasalle rules addressed this by turning the traditional Move-Fire-Melee turn sequence on its ear; DSLB shows that there is another, more elegant method. (Now all I have to do is convince my opponent of the superiority of it without diluting its effectiveness too much by adding house rules limiting its use.)

Movement is an area where the players must be scrupulous in execution, otherwise the game is thrown off. Oblique moves maintain facing, wheels only turn the front and have no straight movement, and pivots simply change the direction faced. If you move 'sloppy' like the free movement with a DBA element, you essentially blur the distinction between a line and a column, thus giving the line a tremendous advantage. This is especially true of the Approach and Contact moves; these must be straight ahead only, so if a unit is not pointed 'dead on' you must burn an action pivoting or wheeling to line up correctly. This can make the difference between a successful charge or not, but can also often negate the cavalry's ability to overrun skirmishers (which must be done in the first action).

So there you have it. In actual game play, it rarely came up, except when a unit is forced to retreat through another unit (it usually cannot clear the unit and 2VS in one retreat move).

Combat - Bombardment, Approach, and Contact - went very smoothly. Once you understand the basics, and the number of Combat Dice to throw, you really don't need the reference charts. The number of modifiers are few and are easy to remember. That said, I still had not gotten the hang of what winning the first, second, or third die meant by the end of the game. Probably in another game I will. What makes for some issues are the special cases: Cavalry automatically takes a DIS after contact if it did not acquire one during combat, who retreats how much, infantry takes the position on winning but cavalry does not, etc. Eventually it will become second-nature, so let's just call this a learning curve. Not at all steep, but one nonetheless.

Design Choices

I noted in the initial review that I wanted to discuss the Proximity Rule with the author, and here is what he wrote:
I made some design choices, to reflect what I consider to be a "wrong" way to play, and is allowed by all rules out there. The Proximity rule is about this. All players I know - when they attack or defend - cram every single square inch of the table with units, so that sometimes you cannot tell one unit from another. I've seen people overlapping one base with another in order to fit both in the same space. That is not what happened on the battlefields. If you want (as I wanted) to avoid this you have no other way than to write an easy rule that plainly says that players can't do that. That's what I did. By the way, many Italian players who have played the game told me that the table looks "more realistic" and "orderly" with this rule. In all, they say it's more "Napoleonic".
In other correspondence with the author he shared some of his design choices with me, which might help you determine if DSLB has the right historical flavor for you.

Attack Columns – it is the author's opinion that the proper method of attack should be using the attack column for speed, switch to line and then approach to weaken the opponent, before going in with the bayonet. If the opponent is sufficiently disordered, the attack column formation can be maintained, allowing them to keep their momentum for a minimum number of actions used.

The French predilection for close combat is modeled with the Determined special rule, which allows a re-roll of a die during Approach. This is not restricted to a particular formation.

Cavalry versus Infantry (Not in Square) – Put simply, the author believes that cavalry, especially battle cavalry (dragoons and heavy cavalry), should be greatly feared and that infantry – even those units that are fresh, in line, and facing the charge – should get into square or face destruction. The math is such that only an exceptionally lucky infantry unit can stand in line in face of a battle cavalry charge; all others will be destroyed.

As I reflect upon other rules, most recently Command and Colors: Napoleonics (CCN), this is also generally the result, so it is not an unusual perception. Perhaps what struck me is that: 1) the odds are greatly in favor of the cavalry in DSLB while it is less so in CCN; and 2) the potential distance that a cavalry unit can charge from 3L plus 1S or 62 cm, where an "average" move might be 12 cm. That is a charge five times the distance of an infantry move in column. (Please note that 62 cm is an exceptional roll, but I was caught by the equivalent of a 44 cm charge, as was my opponent.)

So, I need to add a new factor in rating rules: Fiddly Geometry. This is a rating where small measurements or angles play a role in whether some action succeeds or not. A game like Pirates of the Spanish Main rates Very High; DSLB rates Above Average. Why? Whether a charge is lined up perfectly to 'clip' a unit or an artillery unit is lined up to bombard can be by a few degrees simply because there is no 'arc'; it is straight ahead or nothing.

This is why I say that playing with 'sloppy' movement actually hurts the game. As it is relatively easy to roll two successes with heavy cavalry, burning one action to pivot and 'line up the charge' means a difference of 18 cm that the unit has to use for charging.

By the way, one other comment my opponent made was: "this might be a good game to convert to hexes." That would certainly solve all of the the Fiddly Geometry issues.

Final Grade

So, how do I rate DSLB overall? Easily four out of five stars for me, as I like the level of tactical decision making that the player is presented with, which have definite risks and rewards; no decision is without tangible consequences. The sole detraction was the Fiddly Geometry rating, which has always been the bane of my gaming. I think the fiddly nature of bombardments can easily be solved: allow a battery to pivot up to 45º when performing a Bombardment action.

As for stopping the long range cavalry charges, well, I think you just have to be a stickler with those angles. Having to burn one extra action to line up makes a world of difference. The best solution – one that will lead to the fewest arguments – is what is always recommended for Flames of War games: declare your intentions. If you intend to be lined up with a unit at the end of your move, declare it as such and ask your opponent to verify. If the enemy unit does not move during its turn, gently remind your opponent that you were lined up as you roll three successes with your Cuirassiers!

Will I game with DSLB again? Absolutely. (In fact, I know I am going to be playing this very scenario over again, as it seems like an interesting one, and one that would play differently now that I am used to some of the rules and their impact on tactics.) Given the options available, it is not a game easily taught to new players. You will probably have to figure a way to ease players into it. The rules complexity is on the lower side of Intermediate. The real draw is the uncertainty and excitement generated from activations and reactions. It takes the standard Song engine to a whole new level of decision making.

And that is a Good Thing.

Saturday, January 28, 2012

Comparing Baccus Old and New 6mm Sculpts

First off, let me welcome the new readers Daniel Gurule, William, Steve's Wargame Stuff, and Henry. Glad to have you aboard and I hope you enjoy the posts.

A message on The Miniatures Page asked about the old and new Russian Napoleonic sculpts from Baccus and it just so happens I had recently painted both, but had not put up pictures of the new sculpts. As shown in the pictures below, the new sculpts are on the left and the old to the right.


As you can see, the old plumes on the grenadiers are "weedy" and weak, while the new ones are much more solid. Although the old sculpts may actually be more to scale, it is the effect you are after and they need to be stiff enough not to bend so easily. (Once they get that small, bending them straight without breaking them is exceedingly hard.) Also, the muskets and bayonets are much more solid, if exaggerated a bit.

What is most noticeable between the two sculpts are the lower legs and the "texturing" on the base. The old sculpts make painting the trousers more difficult and sometimes looks like flash (see the second figure from the right on the right stand).

For the most part, the details cast on the figure do not get in the way. The shako cords on the left side can easily be picked out with a paint brush, as can the pack strap on the shoulder.


As shown in the figure above, the faces are detailed enough that you can pick out the cheeks and nose, leaving the underlying black primer as shadows and a moustache.

All in all, the new sculpts are what brought me back to 6mm, as they are easier to paint and the end result looks much nicer. I cannot wait for the French to be re-sculpted, although I will have to, as the Austrians are getting the treatment first, according to the news on the Baccus site.

By the way, the Franco-Prussian War of 1870 line is excellent too. I particularly am impressed with the Bavarians.

Sunday, January 22, 2012

Ganesha Games releases Drums and Shakos Large Battles

First off, I would like to welcome Chris to the reader list, here and over at Solo Battles. Thanks for commenting on one of the entries over there.

Well, I've been waiting for this one for a long time: Ganesha Games has finally released the English edition of Drums and Shakos Large Battles (DSLB)! And only for a mere $8 as a PDF. So what do you get for your money? A full-color version of the rules (meant for an eBook reader), an ink saver version of the rules, separate front and back cover pages in color, and a Quick Reference Sheet (QRS).
A note on the following review: there are many cases where I gloss over exceptions to the basic rules I am describing. It is not laziness that causes me to do this, but brevity. If you have specific questions, I will answer them (but recommend you go to the forum), but this is not intended to be so in-depth that it discourages you from buying the rules! :^)
In case you have not been following the progress of these rules on the Yahoo forum or the author's blog, DSLB is "designed for Divisional-level battles where each player controls two to three Brigades and a small reserve".

Units are represented by bases of multiple figures, rather than individually based figures. (I am sure you can use movement trays to solve that issue, however.) An infantry unit is a battalion of four bases, cavalry a regiment of two bases, and artillery a battery of 2 bases. The number of figures on a base is irrelevant and the preferred basing is:

  • Infantry bases with a frontage of 1.5:1 to 2:1 to depth.
  • Infantry and cavalry bases with the same frontage.
  • All players using the same basing scheme.
As my wooden Napoleonic soldiers are mounted singly, on 1" bases for infantry and 1.5" bases for cavalry, it looks like my base would be 3" by 1.5" with three infantry figures to a base or two cavalry figures to a base. (Artillery remains a problem as my guns are huge. I will have to figure out how to fix that.) That makes my infantry battalion 12 figures (with two spare figures as skirmishers, which this game uses) and the cavalry regiments four figures (tiny!).
The game requires several markers: disorder 1-4, battery fired, proximity violation, and successful reaction. For measuring sticks they now use: Very Short, Short, Medium, Long, 2 x Medium, and 3 x Long.

As with previous variants with the Song engine, a unit has a Quality and a Combat score (although it indicates that artillery only has Quality). In addition, a unit tracks its Disorder level, which is from 0 to 4. The more you are disordered, the more dice your enemy will roll against you in combat. Further, disorder affects your unit's ability to approach the enemy and to count for victory purposes. An important note: once a unit is disordered (DIS1 or more), it can never rally back to DIS0. Finally, infantry units will have a Skirmish (SK) value, represented as singly based figures.

As with most Napoleonic rules where units equal battalions, the infantry can form in Line, March Column, Attack Column, and Square, cavalry can forms in Line or Column, and artillery can be Limbered or Unlimbered (deployed). Unlike some other rules, you do not have to be behind a unit's front edge to count as being on the flank; if an enemy unit starts wholly outside of a unit's front arc (which is basically straight ahead), it is considered on its flank or rear.

Command span for Leaders has changed from 1L to 2M and is not affected by line of sight. There is now a Commander in Chief, which is a Leader of Leaders (much like the Captain in Sixty-One Sixty-Five) who has a Command span of only 1L, but it allows a Leader within range to re-roll 1 failed activation dice.

The heart of the Song engine is the activation roll and the resulting number of actions. In DSLB the player still chooses to roll one, two, or three dice and compares each die to the unit's (or Leader's) Quality to determine if it is a success or failure. As with other Song rules, two or more failures is significant; however rather than ending your turn, you simply end any more chances of activation for that specific Brigade. What differs from the other rules is that a failure now allows your opponent to try a Reaction.

For each failure in activation, your opponent can throw 1D6 to attempt a reaction by one of their units. There are a number of restrictions to reactions, but suffice it to say that the primary one is that a unit can only successfully react once per turn. Reactions, however, can be performed either before the acting unit's actions, in between its actions, or after all of its actions are completed. What is slick about this reaction system is that this is how cavalry counter-charges, defensive fire against charges, evasions from charges, first volleys, etc. all can occur without complex reaction rules. Granted, it takes a failure on the part of your opponent, and then a success on your part, to pull off, but on paper it seems elegant. (I reserve judgement on whether it works until I get a game in.)

Group orders are handled much differently now. Issuing the group order uses an action by the Leader, as before, but now the activation by the group is made against the Leader's Quality, not the lowest Quality value within the group. This means that a good Leader can lead poor quality troops around rather effectively. Group orders cannot be used, however, to get within Approach (1S) range.

DSLB treats the Reserve specially. First, let me state that it is good to see rules that call out a Reserve and have a definition and a function for them. In DSLB they are essentially a pool of units under the care of the Commander-in-Chief, who doles them out to other Brigades. Units in the Reserve do not move until they are assigned out. Again, I'll have to reserve judgment until I try it to see if this really works. (Remember though, this is a Divisional Reserve and the Commander-in-Chief is the Division Commander, not Napoleon or Wellington!)

Movement in DSLB is handled a little differently than in 61-65. In the latter rules you move a specified distance, but had a limitation on the number of actions that could be used for moves, based on your formation. In DSLB you can move for as many actions as you rolled, but the formation dictates how far that move is. To be honest, I prefer the DSLB way, as it is easier to remember. Basically movement is 1S for infantry in Line and 1M for infantry in column while cavalry is 1L. Movement is within the arc of 45º to the front, anything outside of that causes a reduction of one length (e.g. 1S become 1VS, 1M becomes 1S, etc.). Maneuvers allowed are: move straight, move oblique (up to 45º), move laterally, move backwards, wheel (up to 90º), and about face. Interesting to note that a left/right face maneuver is not indicated, so the Seven Year's War tactic of marching in column then wheeling by company to the left or right by 90º, in order to form a line, is not allowed. Simple matter to add, however, although I suspect they just simply treat it as a change of formation (1 action) with a change of face thrown in. (Although it does not mention being able to change face as part of changing formation.)

There is an interesting rule in DSLB, one in which I would like to ask the author why it was included. The Proximity Rule states that a unit cannot end its movement within 1VS of another friendly unit, unless it is Approaching an enemy. I don't have a problem with the rule, I was just wondering why he chose to add gaps between the units and whether he found there was any effect on play.

Combat is represented in three ways: Bombardment, Approach, and Contact. Bombardment is only allowed to unlimbered artillery, while Approach is the range of volleys (although cavalry does get to fight in Approach). Finally, Contact is very short-ranged firefights, cavalry melees, and even the rare bayonet charge.

Unlike other Song rules, DSLB has you roll a number of Combat Dice (CD). Generally only three of them count, but if you have more, they are not completely wasted. Each side compared its dice, from highest to lowest, to determine how many (and which) wins you achieve. The number of dice you throw is affected type of combat, type of unit, formation of the unit, range (for bombardment), the enemy unit being disordered, and conditions. The nice part is that the modifiers add or subtract dice, not modify the die rolls themselves.

For Bombardment, the battery winning the first (highest) die results in the target being Disordered, but winning the second die results in the target retreating, while winning the third die allows the shot to bounce through and hit a target behind. So, as you can see, the opposed die rolls are more complex than in the general Song engine, which concerns itself with beating (even and odd), doubling, and tripling.

As Approach represents volleying and the morale threat of cavalry. As with Bombardment, Combat Dice are rolled and compared from highest to lowest. The first die can inflict disorder on the loser (to both in a draw), but the second and third die gives the winner of that comparison an action to use. Thus the attacker could have 0, 1, or 2 actions from approach while the defender could also have actions. Generally, these actions can be used to move into contact, change formation, back away from the opponent, and even cancel out one action of your opponent.

Again, it is these actions that help represent counter-charging, forming a hasty square in the face of a cavalry charge, etc. that relieves the author of writing a whole slew of special rules to cover special situations. Forming square is simply a formation change, but if you did not do it in anticipation of a cavalry charge and were caught in line when the charge was launched, you better win one of those actions in the Approach! I like it!

Contact is a consequence of Approach; you must use one of the actions from the Approach combat results to move forward into Contact. Combat in contact is much more decisive (as you might imagine). The first die determines who wins and there are a number of situations in which a loss in Contact means your unit is eliminated. Note: infantry not in square against cavalry is one of those situations. (I need to look closer at the math, because I think that cavalry might be able to break infantry in square a little too easily.)

If cavalry eliminates their enemy after Contact, and another enemy unit is within range, they can take a Breakthrough and move directly into Contact with the second enemy unit. Personally, I have always liked cavalry breakthrough moves, which is why I like Column, Line, and Square, BattleLore, and Command and Colors: Napoleonics so much. (It is the rule that needs to be added to Battle Cry!)

There are rules for Built-Up Areas (towns, etc.), table setup and deployment, grand batteries, worn units, a host of special abilities to represent different units types (Militia, Cuirass, Lance, Impetuous, etc.) and Leaders (Charismatic, Cautious, etc.), some scenarios – both historical and conjectural – rules on making your own force lists, and even an FAQ.

The last item I want to focus on are the rules for winning the battle. The two criteria are: losses and penetration into enemy territory (gaining ground).

Before the game each player calculates their Divisional Break Point (DBP), which is basically 1/2 the number of units. As units are eliminated points are accumulated and once the DBP is reached, the battle is lost. Note that in general each unit is worth one point, but some are worth more, such as Guards, Elites, Heavy Cavalry, Artillery, and Leaders. In addition, which a Brigade is Shaken (has more DIS than units in the Brigade), an additional point towards the DBP is gained.

In addition, penetrating into the enemy's territory (moving units into the enemy's Zone 1, 2, or 3) temporarily creates points towards the DBP. So, for example, a cavalry unit breaking into the rear can have an effect on a Division that might ordinarily hold a little while longer.

If both players reach their DBP in the same phase, penetration into enemy territory is treated as a tie breaker.

Summary

So, what do I think of the rules? I will be honest, I have been fooled before by rules that read well, but once you start gaming and the math comes into play, they seem to fall apart. So final judgment will come when I have a chance to play them.

That said, I clearly like the Song engine – although these taken them in new and exciting directions, rather than the tried and true – and these build on that foundation. Ross MacFarlane came up with a method of reviewing rules, so I will give that a try here.

Drama – The mechanism for activating – choosing the number of dice to roll and determining the number of successes – always adds tension for the player. It is lessened a bit by having two failures stop activation within a Brigade and not by the entire side, which is a good thing, but it is still lessened nonetheless. Conversely, tension is increased because additional actions can be converted to Combat Dice. That and not limiting the number of movement actions gives the player more of a reason to push the envelope and roll more dice. I definitely like tying one player's gambling to the opponent (i.e. activation failures give your opponent a chance to react and exploit that failure).

Uncertainty – The Song engine is all about uncertainty, as it adds a number of random factors through the rules (activation, combat, etc.). Uncertainty is increased even more, due to your opponent being able to react during your move and to the way combat is resolved.

Engaging – DSLB engages the players with meaningful decisions. One of the features that I really like about DSLB is that a number of special rules are not required for special situations. A good example is forming square. Many rules simply let the player form square if charged by cavalry (some may require a roll to succeed). In many cases that takes away the incentive for the player to form square during his own turn, in anticipation. In DSLB you could form square, for example:

  • During your own activation.
  • In reaction to an enemy cavalry unit's activation failure.
  • By winning an Approach action.
Forming square at each of those points has its own set of risks. Forming during your turn may cause the enemy to forego the charge and have them send in the infantry, to take advantage of your vulnerable formation. Forming during a reaction requires an enemy failure and a successful Quality check of your own, but at least you now know the cavalry is committing. But doing it then means your firing during Approach will be penalized. Waiting until winning an Approach action is clearly the riskiest proposition and would likely only occur when the infantry is clearly better quality than the cavalry (or if the player is an unrepentant gambler). Knowing when to take the risks, and knowing that the consequences change is what makes these rules so engaging.

Heads Up – This is the ability to easily memorize the rules, even to the point of playing without a QRS. This is the area that will require confirmation by playing it a bit, but my gut feel is that the increased complexity of the combat interactions, especially what modifiers come into play in the three types of combat, will lower these rules' score in this area.

Appropriately Flavored – This too I think I will have to take a pass on, until I get a few games under my belt. Largely it will be determined by the tables in the back of the rules that are used to build and purchase an army. Flavor is provided by adding combinations of Quality, Combat, and Special Rules and applying them to the units, but there is probably going to be a lot of objections from the historical purists about how easy it is to produce an "unrealistic" force.

The use of skirmishers looks simple, but effective, however I noticed there is no provision for skirmisher units, such as the British Rifles in their company-sized penny packets, battalions of Jagers or Legere in their open order, or even Revolutionary-era French units in skirmisher swarms.

Another factor that the Napoleonic purists will not like, as they complain about it with other rules, is the generic size of all units. Specifically people like to see large units (Austrians, British Guards, etc.) modeled, which DSLB does not seem to have an answer to.

Scalable – Ultimately these rules are targeted at a player controlling a Division of about 16 maneuver units. It is probably not difficult for an experienced player to handle more, but I think 24 would be about the limit. Multiple players per side would allow you to play out Corps-sized battles, but then you start running into problems with timing at the Divisional boundaries (i.e. which Division activates first). The typical method is to gloss over this problem and deal with it when the situation comes up, just so the turns keep moving. But it definitely could be a problem with a turn taking a long time, due to a lot of combat, with one Division, leaving all of the other Division commanders sitting around. Of course, that is nothing different than I dealt with when I played Column, Line, and Square.

For me the question becomes one not of scaling these rules from skirmish to Corp-level, but that of scaling the figures used through those levels. Given the flexible basing requirements, if you base your figures singly you can use them for Song of Drums and Shakos, a Napoleonic version of Sixty-One Sixty-Five, and, by using movement trays, with Song of Drums and Shakos Large Battles.

I look forward very much to giving these rules a try. I may have to give them a go using AWI figures for Napoleonics (blasphemous, I know), as I don't have anywhere near enough for a Division per side (yet, but I am working on it), so look for that soon. All in all, two thumbs up, five stars, etc.

Monday, January 16, 2012

Command and Colors variations

I am sorry that I haven't written something in a while, not because you had nothing to read (after all there are a lot of good blogs out there), but because that meant I wasn't gaming! Now that I am back home from traveling and my proposal writing is almost done (we are usually done with that by the end of September), I can get back to making wooden soldiers, painting, and gaming.

Welcome to new readers Gnotta', Ivor Janci, and madaxeman. Mr. Madaxeman (sir), you have a helluva' site.

As I had little to do last week, other than sit in my hotel room and vegetate in front of the television (a rarity for me, as I don't get television shows at home; I only watch movies on DVD), I decided to take another pass at a new variation of the basic Command and Colors rules. Somewhere between BattleLore and Battle Cry!, I think, with a little bits of the other games thrown in. As indicated in my previous Command and Colors review, there are a number of factors that make each game different, so picking and choosing the bits you like can make for an interesting game.

One of the things implied in the various games is scale – as in ground and unit – with Command and Colors: Napoleonics, for example, having each hex represent more ground than in say BattleLore. This drastically affects things like the range of weapons, thus a musket in the former shoots two hexes while a simple bow in the latter shoots four hexes.

I started mulling over scale and weapons and started with some preliminary figures:

American War of Independence
Infantry with Muskets: 3-2-1
Infantry with Rifles: 2-2-1-1
Cavalry: 3
Mounted Infantry with Muskets: 2-1-1
Field Artillery: 4-3-2-1-1-1
Light Artillery: 2-2-1-1

Napoleonic Wars 
Infantry with Muskets: 3-1
Infantry with Rifles: 2-1-1
Cavalry: 3
Heavy Artillery: 5-3-2-1-1-1
Field Artillery: 4-3-2-1-1
Light Artillery: 2-1-1
Horse Artillery: 3-2-1-1

American Civil War 
Infantry with Smoothbore Muskets: 3-2-1
Infantry with Rifled Muskets: 4-3-2-1
Infantry with Breechloading Rifles: 5-4-2-1
Infantry with Repeating Rifles 6-5-3-1
Cavalry with Pistols and Shotguns: 3
Cavalry Carbines and Sabres: 3-2-1
Cavalry with Repeaters and Sabres: 3-2-1-1
Smoothbore Field Artillery: 6-5-3-1-1
Rifled Field Artillery: 5-4-3-2-1-1

In the data above the numbers represent the number of dice thrown by a standard unit, starting at one hex away, two hexes away, etc. Note that this method is more like Battle Cry! or  Memoir '44 where the number of dice thrown diminishes with range, and less like BattleLore or Command and Colors: Napoleonics where it stays constant. What I want to try from Command and Colors: Napoleonics is the idea of reducing the die as the number of figures are reduced.

Take a simple example: the American Civil War Infantry with Rifled Musket at 4-3-2-1. Assume for a moment that the average infantry unit has four figures. If the unit throws four dice with four figures at one hex, it is easy to extrapolate that each figure generates one die of "firepower" at one hex range. At two hexes each figure would generate 0.75 die, only 0.5 die at three hexes, and just 0.25 die at four hexes. Rather than doing all the math in your head, I produced a simple table showing the number of dice rolled based on the number of figures and the range. (Actually, this is not original and was a variant for BattleLore some time ago.)

The basic die I was going to use was two Infantry faces, one Cavalry face, one Artillery face, on Sabres face, and one Flag face. The Sabres face would only hit in close combat (one hex away).

The other significant factors are Support and Battle Back. I like the idea of Support (having two or more friendly units adjacent to a unit) allowing you to ignore one Flag rolled against you, as it encourages the player to adopt formations and not run units out alone, by themselves. In addition, allowing a unit to Battle Back, if they have support and were not forced to retreat, is another good addition, again because it encourages players to operate in formations.

As with BattleLore, the ability to have troops that can Battle Back without support (if they don't retreat) is a good option; it allows for more variation. However, it should not be as common as Iron Dwarves or simply declaring everyone is Battle Savvy.

The one area that I wanted to change most was to remove the sections (left, right, and center) and make it more free-flowing, like Battles of Westeros. To that end I decided to try a radical change from all previous variants: I used no command cards or any way of restricting who was ordered. Simply put, all units are ordered every turn.

Now, you might be thinking to yourself that limiting the number of units that are ordered is a critical component of a Borg design. I certainly thought so ... at least I did until I tried it. Granted, it is only one playtest, but I am doing "straight" Command and Colors: Napoleonics (the Waterloo scenario) and it has not played out anywhere near what I thought it would. I thought units would be destroyed faster, as multiple units would pound a single attacking unit. That is true, if a single unit attacks, but as you can move all your units, fire tends to be spread a little more evenly than I first imagined.

I am still working out the kinks of this experiment, but I thought I would share it and see what comments it brought forth, if any. At the very least, it is an interesting game.

Blog Archive

Blog and Forum Pages

Popular Posts

Followers

About Me

My photo
Huachuca City, Arizona, United States
I am 58 yrs old now. I bought a house in Huachuca City, AZ working for a software company for the last three years. To while away the hours I like to wargame -- with wooden, lead, and sometimes paper miniatures -- usually solo. Although I am a 'rules junkie', I almost always use rules of my own (I like to build upon others' ideas, but it seems like there is always something "missing" or "wrong").